Zabbix 主要有以下几个组件组成:
Zabbix Server:Zabbix 服务端,是 Zabbix 的核心组件。它负责接收监控数据并触发告警,还负责将监控数据持久化到数据库中。
Zabbix Agent:Zabbix 客户端,部署在被监控设备上,负责采集监控数据,采集后的数据发送给 Zabbix Server 处理。Zabbix Agent 目前有两个版本:Zabbix agent 和 Zabbix agent 2。前者是 C 语言开发的,几乎支持所有的主流平台。而后者是 Go 开发的,优点包括:能有效降低 TCP 连接的数量;支持更高的并发;易于扩展。目标是替代 Zabbix agent ,目前只支持 Linux 和Windows 两个平台。
Zabbix Proxy:代替 Zabbix Server 接收监控数据并进行预处理,预处理后的数据批量发送给 Zabbix Server,这样可减轻 Zabbix Server 的压力。
Web 页面:可通过 Web 页面来管理和维护被监控设备的配置信息、查看监控数据、配置告警等。
数据库:负责存储被监控设备的配置信息和监控数据。支持的数据库有:MySQL(Percona,MariaDB),Oracle,PostgreSQL,TimescaleDB for PostgreSQL,SQLite
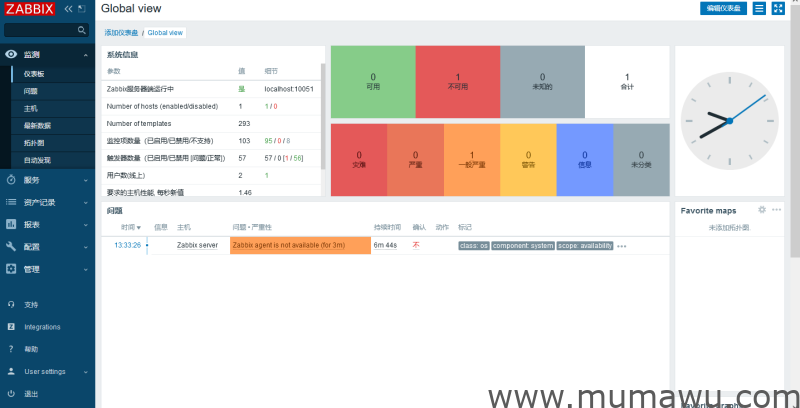
![图片[1]-Centos 7.9 部署 Zabbix 6.0-木马屋](https://www.mumawu.com/wp-content/uploads/2023/06/Snipaste_2023-06-15_21-40-21-1024x522.png?v=1686836430)
修改系统IP和关闭防火墙
修改IP地址
vi /etc/sysconfig/network-scripts/ifcfg-ens33
配置如下
TYPE=Ethernet
PROXY_METHOD=none
BROWSER_ONLY=no
BOOTPROTO=static
DEFROUTE=yes
IPV4_FAILURE_FATAL=no
IPV6INIT=yes
IPV6_AUTOCONF=yes
IPV6_DEFROUTE=yes
IPV6_FAILURE_FATAL=no
IPV6_ADDR_GEN_MODE=stable-privacy
NAME=ens33
UUID=16b99d98-633a-497f-bb9f-cba8725ab6bf
DEVICE=ens33
ONBOOT=yes
IPADDR=192.168.2.113
NETMASK=255.255.255.0
GATEWAY=192.168.2.1
DNS1=192.168.2.1
DNS2=114.114.114.114
重启网络
systemctl restart network
关闭防火墙
systemctl stop firewalld
systemctl disable firewalld
vm /etc/selinux/config
配置如下
# This file controls the state of SELinux on the system.
# SELINUX= can take one of these three values:
#     enforcing - SELinux security policy is enforced.
#     permissive - SELinux prints warnings instead of enforcing.
#     disabled - No SELinux policy is loaded.
SELINUX=disabled
# SELINUXTYPE= can take one of three values:
#     targeted - Targeted processes are protected,
#     minimum - Modification of targeted policy. Only selected processes are protected.
#     mls - Multi Level Security protection.
# SELINUXTYPE=targeted
![图片[2]-Centos 7.9 部署 Zabbix 6.0-木马屋](https://www.mumawu.com/wp-content/uploads/2023/06/Snipaste_2023-06-15_18-45-49-1024x697.png?v=1686825992)
更改清华源
备份
mv /etc/yum.repos.d/CentOS-Base.repo /etc/yum.repos.d/CentOS-Base.repo.bak
编辑配置
vim /etc/yum.repos.d/CentOS-Base.repo
配置如下
# CentOS-Base.repo
#
# The mirror system uses the connecting IP address of the client and the
# update status of each mirror to pick mirrors that are updated to and
# geographically close to the client. You should use this for CentOS updates
# unless you are manually picking other mirrors.
#
# If the mirrorlist= does not work for you, as a fall back you can try the
# remarked out baseurl= line instead.
#
#

[base]
name=CentOS-$releasever - Base
baseurl=https://mirrors.tuna.tsinghua.edu.cn/centos/$releasever/os/$basearch/
#mirrorlist=http://mirrorlist.centos.org/?release=$releasever&arch=$basearch&repo=os
gpgcheck=1
gpgkey=file:///etc/pki/rpm-gpg/RPM-GPG-KEY-CentOS-7

#released updates
[updates]
name=CentOS-$releasever - Updates
baseurl=https://mirrors.tuna.tsinghua.edu.cn/centos/$releasever/updates/$basearch/
#mirrorlist=http://mirrorlist.centos.org/?release=$releasever&arch=$basearch&repo=updates
gpgcheck=1
gpgkey=file:///etc/pki/rpm-gpg/RPM-GPG-KEY-CentOS-7

#additional packages that may be useful
[extras]
name=CentOS-$releasever - Extras
baseurl=https://mirrors.tuna.tsinghua.edu.cn/centos/$releasever/extras/$basearch/
#mirrorlist=http://mirrorlist.centos.org/?release=$releasever&arch=$basearch&repo=extras
gpgcheck=1
gpgkey=file:///etc/pki/rpm-gpg/RPM-GPG-KEY-CentOS-7

#additional packages that extend functionality of existing packages
[centosplus]
name=CentOS-$releasever - Plus
baseurl=https://mirrors.tuna.tsinghua.edu.cn/centos/$releasever/centosplus/$basearch/
#mirrorlist=http://mirrorlist.centos.org/?release=$releasever&arch=$basearch&repo=centosplus
gpgcheck=1
enabled=0
gpgkey=file:///etc/pki/rpm-gpg/RPM-GPG-KEY-CentOS-7

清理缓存
yum clean all
重新生成缓存
yum makecache
升级更新包
yum update
安装数据库
#进入目录
cd /usr/local/src/
#下载MYSQL8.0
wget https://dev.mysql.com/get/Downloads/MySQL-8.0/mysql-8.0.30-1.el7.x86_64.rpm-bundle.tar
#解压
tar -xvf mysql-8.0.30-1.el7.x86_64.rpm-bundle.tar
#强制安装
sudo rpm -ivh mysql-community-*  --force --nodeps
#创建数据存储目录
mkdir -p /data/mysql
chown -R mysql:mysql /data/mysql
#修改配置
vim /etc/my.cnf
#配置如下
datadir=/data/mysql
socket=/var/lib/mysql/mysql.sock
log-error=/var/log/mysqld.log
pid-file=/var/run/mysqld/mysqld.pid
character-set-server=utf8mb4
collation-server=utf8mb4_general_ci
port=3306
lower_case_table_names=1
max_connections=500
#启动数据库
yum install libaio
systemctl enable mysqld
systemctl start mysqld
#修改数据库密码
#查看密码
cat /var/log/mysqld.log | grep password
2023-06-15T12:06:37.523121Z 6 [Note] [MY-010454] [Server] A temporary password is generated for root@localhost: t>sqg1wIIf:g
#进入mysql
mysql -uroot -pt>sqg1wIIf:g
#修改密码
alter user 'root'@'localhost' identified by 'Wang921028@';
flush privileges;
# 密码检查等级,0/LOW、1/MEDIUM、2/STRONG
set global validate_password.policy=0;
# 密码的最短长度
set global validate_password.length=6;
# 密码至少要包含的小写字母个数和大写字母个数
set global validate_password.mixed_case_count=0;
#创建zabbix 数据库
create database zabbix character set utf8 collate utf8_bin;
#创建用户
create user 'zabbix'@'localhost' identified with mysql_native_password by '921028';
#设置权限
grant all privileges on zabbix.* to 'zabbix'@'localhost';
flush privileges;
部署nginx
#安装Nginx
rpm -Uvh http://nginx.org/packages/centos/7/x86_64/RPMS/nginx-1.20.0-1.el7.ngx.x86_64.rpm
#创建Web目录
mkdir /data/web
#备份配置文件
mv /etc/nginx/conf.d/default.conf /etc/nginx/conf.d/default.conf.bak+
#修改配置
vim /etc/nginx/nginx.conf
#复制下面替换
user  nginx;
worker_processes  auto;
error_log  /var/log/nginx/error.log notice;
pid        /var/run/nginx.pid;

events {
    worker_connections  1024;
}

http {
    include       /etc/nginx/mime.types;
    default_type  application/octet-stream;

    log_format  main  '$remote_addr - $remote_user [$time_local] "$request" '
                      '$status $body_bytes_sent "$http_referer" '
                      '"$http_user_agent" "$http_x_forwarded_for"';

    access_log  /var/log/nginx/access.log  main;
    sendfile        on;
    #tcp_nopush     on;
    keepalive_timeout  65;
    #gzip  on;
    server {
      listen       80;
      server_name  localhost;
      root         /data/web;
      location / {
        index  index.php index.html index.htm;
      }
      location ~ \.php$ {
        fastcgi_pass   127.0.0.1:9000;
        fastcgi_index  index.php;
        fastcgi_param  SCRIPT_FILENAME  $document_root$fastcgi_script_name;
        include        fastcgi_params;
      }
    }
}

#启动nginx
systemctl  enable nginx
systemctl  start nginx
PHP部署
#安装PHP依赖
yum -y install epel-release
rpm -Uvh https://mirror.webtatic.com/yum/el7/webtatic-release.rpm
yum -y install gcc gcc-c++ php72w-cli php72w-fpm php72w-gd php72w-mbstring php72w-bcmath php72w-xml php72w-ldap php72w-mysqlnd
#修改配置文件
vim /etc/php.ini
#配置如下
368:max_execution_time = 300
378:max_input_time = 300
656:post_max_size = 16M
#创建web目录
cd /data/web/
#创建php测试页面
vim index.php
代码如下
<?php
phpinfo();
?>
#启动php
systemctl  enable php-fpm
systemctl  start php-fpm
Zabbix部署
#创建用户
[root@zabbix-40 ~]# groupadd zabbix
[root@zabbix-40 ~]# useradd -g zabbix -M -s /sbin/nologin zabbix
#下载安装
[root@zabbix-40 ~]# cd /usr/local/src
[root@zabbix-40 /usr/local/src]# wget https://cdn.zabbix.com/zabbix/sources/stable/6.0/zabbix-6.0.1.tar.gz
[root@zabbix-40 /usr/local/src]# tar -xf zabbix-6.0.1.tar.gz
[root@zabbix-40 /usr/local/src]# cd zabbix-6.0.1/
#安装依赖
yum -y install  mysql-devel pcre-devel openssl-devel zlib-devel libxml2-devel net-snmp-devel net-snmp libssh2-devel OpenIPMI-devel libevent-devel openldap-devel   libcurl-devel

#编译安装
./configure --sysconfdir=/etc/zabbix --enable-server --with-mysql --with-net-snmp --with-libxml2 --with-ssh2 --with-openipmi --with-zlib --with-libpthread --with-libevent --with-openssl --with-ldap --with-libcurl --with-libpcre
make install
#修改配置文件(前面的数字代表的是要修改属性字段的行数 例如 12:)
[root@zabbix-40 ~]# vim /etc/zabbix/zabbix_server.conf
[root@zabbix-40 ~]# grep -n '^[a-Z]' /etc/zabbix/zabbix_server.conf
12:ListenPort=10051
38:LogFile=/tmp/zabbix_server.log
87:DBHost=localhost
99:DBName=zabbix
115:DBUser=zabbix
123:DBPassword=123123
507:Timeout=4
593:LogSlowQueries=3000
708:StatsAllowedIP=127.0.0.1
#向数据库中导入zabbix的库表及数据(注意导入的顺序)
mysql -uzabbix -p921028 zabbix < /usr/local/src/zabbix-6.0.1/database/mysql/schema.sql
mysql -uzabbix -p921028 zabbix < /usr/local/src/zabbix-6.0.1/database/mysql/images.sql
mysql -uzabbix -p921028 zabbix < /usr/local/src/zabbix-6.0.1/database/mysql/data.sql
#移动zabbix前端页面到网站根目录
cp -rp /usr/local/src/zabbix-6.0.1/ui/* /data/web/
cp:是否覆盖"/data/web/index.php"? y

#配置zabbix系统启停命令(注意这个文件是新增的)
vim /usr/lib/systemd/system/zabbix-server.service
[Unit]
Description=Zabbix Server with MySQL DB
After=syslog.target network.target mysqld.service
[Service]
Type=simple
ExecStart=/usr/local/sbin/zabbix_server -f
User=zabbix
[Install]
WantedBy=multi-user.target
#重新加载system文件
systemctl daemon-reload
systemctl enable zabbix-server
systemctl start zabbix-server
安装web
浏览器输入IP ,输入数据库密码,一步一步完成。
报错解决
无法创建配置文件
![图片[3]-Centos 7.9 部署 Zabbix 6.0-木马屋](https://www.mumawu.com/wp-content/uploads/2023/06/Snipaste_2023-06-15_21-36-10.png)
cp /data/web/conf/zabbix.conf.php.example /data/web/conf/zabbix.conf.php
chown zabbix:zabbix /data/web/conf/zabbix.conf.php
vim /data/web/conf/zabbix.conf.php
#只修改PASSWORD的密码
$DB['PASSWORD']			= '123123';
解决zabbix 6.0 中文乱码问题
#将windows的 C:\Windows\Fonts 路径下将楷体的ttf文件复制到linux的 /data/web/assets/fonts 目录下,
#目录下有simkai.ttf这个新上传的文件
 ll /data/web/assets/fonts
#总用量 12252
-rw-r--r-- 1 zabbix zabbix   756072 2月  28 2022 DejaVuSans.ttf
-rw-r--r-- 1 root   root   11787328 12月 19 16:57 simkai.ttf
#替换配置文件中的默认字体
 sed -i 's/DejaVuSans/simkai/g' /data/web/include/defines.inc.php
#如果这里之前是修改了网页路径的话,到自己的路径下找include/defines.inc.php即可
#记录一下还有一个可能发送的乱码问题(主机重命名时带有中文的时候无法生效)
Zabbix不支持主机名中存在中文字符的,要让zabbix主机名支持中文,需要修改zabbix的php配置文件
 vim /data/web/include/defines.inc.php
#将下面的字段(大概在1198 行)
define('ZBX_PREG_INTERNAL_NAMES', '([0-9a-zA-Z_\. \-]+)');
#改成
define('ZBX_PREG_INTERNAL_NAMES', '([0-9a-zA-Z_\. \-\x{80}-\x{ff}]+)');

#改完重启一些zabbix-server
 systemctl restart zabbix-server
© 版权声明
THE END







![[原创]木马屋下载器-木马屋](/wp-content/uploads/2026/01/Snipaste_2026-01-04_09-06-09.png.png)

![[经典版本]战神天龙-木马屋](/wp-content/uploads/2025/10/Snipaste_2025-10-10_19-42-42.png.png)
![[经典天龙]神王天龙-木马屋](/wp-content/uploads/2025/10/Snipaste_2025-10-10_19-05-08.png.png)

暂无评论内容